  ‘Boudoir Table Lamp’ is a sculptural lighting piece of my own design.
I wanted to push the limits of good taste, going so far as to make a piece so tacky it became cool again. This table lamp is intentionally oversized, reminiscent of the exuberant 1950s. The look is decidedly sexy. Some might even say ‘naughty’. The raw material for this lamp was 1/2” thick steel plate. The powerhammer was used to push, pull, and planish this piece into existence. The ten blood-red panels are made of stained glass pieces fused in a custom clay form. These lumpy glass panels surround a mica-ensconced frame and are suspended on riveted hangers. I played around on the powerhammer until I was able to accurately reproduce the shapes for the lamp I’d sketched on paper and fleshed out with modeling clay. Two important considerations for me when designing a piece are that it look attractive from all angles, plus I want my lighting pieces to look sculptural when either lit or unlit. The end result is a lamp that’s spot-on for what I envisioned in my mind’s eye. I like the shapes and the way they flow as well as the intentional ‘chunkiness’ of the piece. I'm grateful to the folks who helped me bring it to fruition with their guidance, input, and unfailing encouragement. I’m keen on making more lighting like this. Please let me know if you have a boudoir, lair, restaurant, business, or space station of your own in need of illumination. I’d welcome the opportunity to design and create some sculptural lighting for you.  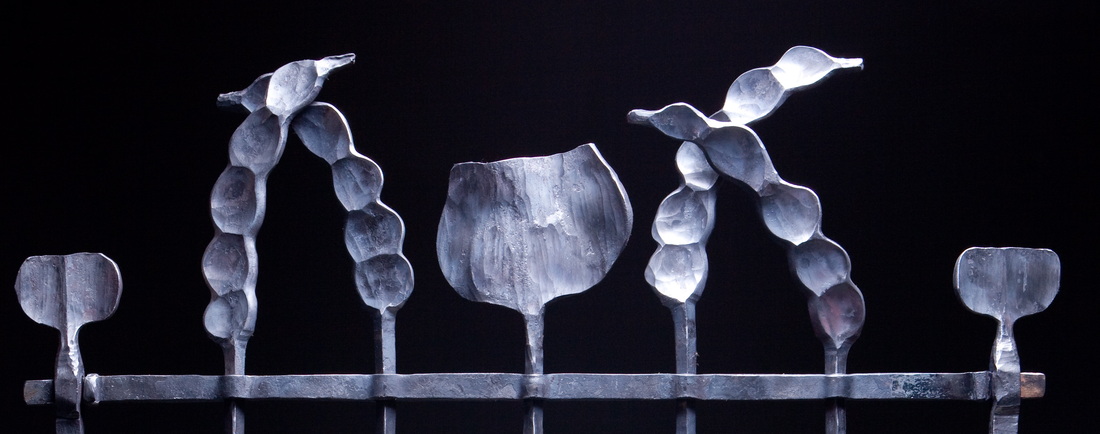 This garden gate contains examples of traditional joinery. There are no screws holding this piece together, nor has it been welded anywhere. I urge you to stop reading right now and just look at the pretty pictures. From here on out, the devil is in the details of how this piece came to fruition.
The top and bottom bars were slit and drifted on the diamond to the desired size, allowing the pickets to pass through. The tenons on the top and bottom bars fit snugly into the mortises of the stiles. Of course, the mortises were slit and drifted as well, and each tenon was exactly sized to fit through its mortise. To hold it all together, heat the ends and upset the metal. Now you’ve got a gate as solid as a World War II veteran’s reputation. Of course, prior to assembly, the metal stock had to be hammered into the desired shape/length/thickness, the frame had to be made square, the pickets et al. had to fit through their openings snugly but not too loosely, and on and on and on... I won’t go into all the gory details because, honestly, there are just too many to dwell on. The end result is attractive and speaks for itself (with far fewer curse words as the creating of it did!). The finished gate is about 32” wide and 40” tall from the bottom bar to the top bar. The pickets add another 8” or so to the height. This garden gate was a class project at Austin Community College in the ‘Powerhammer’ class. Each of us intrepid souls in the class made a basic frame as designed by the instructor, William Bastas. We were then encouraged to embellish the pickets with our own design. For my picket design, I opted for a stylized ‘pod’ theme reminiscent of seeds or beans. Art dies (also known as texturing dies) and ball dies were used to create the finials on each picket and the two stiles. Blacksmithing can transform metal stock from its original shape so drastically that it’s difficult to ascertain the shape of the original metal. For example: The middle picket started off life as a 12” long piece of 2” wide x 1” thick solid steel. The end result is a 40” long picket that’s 5/8” in diameter and is topped with a 6” wide x 4” tall finial. It’s as close to magic as I’m ever gonna get. |

|
LAURAARMSTRONG.STUDIO
|
Copyright 2023 Laura Armstrong. All rights reserved.
|